Mastodon

Graph migrations

One of the things that is not obvious at first glance is how “broad” ArangoDB is. By combining the flexibility of the document model with the joins of the graph model, ArangoDB has become a viable replacement for Postgres or MySQL, which is exactly how I have been using it; for the last two years it’s been my only database.

One of the things that falls out of that type of usage is a need to actually change the structure of your graph. In a graph, structure comes from the edges that connect your vertices. Since both the vertices and edges are just documents, that structure is actually just more data. Changing your graph structure essentially means refactoring your data.

There are definitely patterns that appear in that refactoring, and over the last little while I have been playing with putting the obvious ones into a library called graph_migrations. This is work in progress but there are some useful functions working already and could use some proper documentation.

eagerDelete

One of the first of these is what I have called eagerDelete. If you were wanting to delete Bob from graph below, Charlie and Dave would be orphaned.

Screenshot from 2016-04-06 10-55-54

Deleting Bob with eagerDelete means that Bob is deleted as well as any neighbors whose only neighbor is Bob.

gm = new GraphMigration("test") //use the database named "test"
gm.eagerDelete({name: "Bob"}, "knows_graph")

alice_eve

mergeVertices

Occasionally you will end up with duplicate vertices, which should be merged together. Below you can see we have an extra Charlie vertex.

extra_charlie

gm = new GraphMigration("test")
gm.mergeVertices({name: "CHARLIE"},{name: "Charlie"}, "knows_graph")

merged_charlie

attributeToVertex

One of the other common transformations is needing to make a vertex out of attribute. This process of “promoting” something to be a vertex is sometimes called reifying. Lets say Eve and Charlie are programmers.

knows_graph

Lets add an attribute called job to both Eve and Charlie identifying them as programmers:

adding_job_attr

But lets say that we decide that it makes more sense for job: "programmer" to be a vertex on it’s own (we want to reify it). We can use the attributeToVertex function for that, but because Arango allows us to split our edge collections and it’s good practice to do that, lets add a new edge collection to our “knows_graph” to store the edges that will be created when we reify this attribute.

adding_works_as

With that we can run attributeToVertex, telling it the attribute(s) to look for, the graph (knows_graph) to search and the collection to save the edges in (works_as).

gm = new GraphMigration("test")
gm.attributeToVertex({job: "programmer"}, "knows_graph", "works_as", {direction: "inbound"})

The result is this:

after_attrTo_vertex

vertexToAttribute

Another common transformation is exactly the reverse of what we just did; folding the job: "programmer" vertex into the vertices connected to it.

gm = new GraphMigration("test")
gm.vertexToAttribute({job: "programmer"}, "knows_graph", {direction: "inbound"})

That code puts us right back to where we started, with Eve and Charlie both having a job: "programmer" attribute.

knows_graph

redirectEdges

There are times when things are just not connected the way you want. Lets say in our knows_graph we want all the inbound edges pointing at Bob to point instead to Charlie.
knows_graph

We can use redirectEdges to do exactly that.

gm = new GraphMigration("test")
gm.redirectEdges({_id: "persons/bob"}, {_id: "persons/charlie"}, "knows_graph", {direction: "inbound"})

And now Eve and Alice know Charlie.

redirected_edges

Where to go from here.

As the name “graph migrations” suggests the thinking behind this was to create something similar to the Active Record Migrations library from Ruby on Rails but for graphs.

As more and more of this goes from idea to code and I get a chance to play with it, I’m less sure that a direct copy of Migrations makes sense. Graphs are actually pretty fine-grained data in the end and maybe something more interactive makes sense. It could be that this makes more sense as a Foxx app or perhaps part of Arangojs or ArangoDB’s admin interface. It feels a little to early to tell.

Beyond providing a little documentation the hope here is make this a little more visible to people who are thinking along the same lines and might be interested in contributing.

Back up your data, give it a try and tell me what you think.
Flash messages for Mapbox GL JS

I’ve been working on an application where I’m using ArangoDB’s WITHIN_RECTANGLE function to pull up documents within the current map bounds. The obvious problem there is that the current map bounds can be very very big.

Dumping the entire contents of your database every time the map moves sounded decidedly sub-optimal to me so I decided to calculate the area within the requested bounds using Turf.js and send back an error if it’s to big.

So far so good, but I wanted a nice way to display that error message  as a notification right on the map. There are lots of ways to tackle that sort of thing, but given that this seemed very specific to the map, I thought I might take a stab at making it a mapbox-gl.js plugin.

The result is mapbox-gl-flash. Currently you would install it from github:

npm install --save mapbox-gl-flash

I’m using babel so I’ll use the ES2015 syntax and get a map going.

import mapboxgl from 'mapbox-gl'
import Flash from 'mapbox-gl-flash'

//This is mapbox's api token that it uses for it's examples
mapboxgl.accessToken = 'pk.eyJ1IjoibWlrZXdpbGxpYW1zb24iLCJhIjoibzRCYUlGSSJ9.QGvlt6Opm5futGhE5i-1kw';
var map = new mapboxgl.Map({
    container: 'map', // container id
    style: 'mapbox://styles/mapbox/streets-v8', //stylesheet location
    center: [-74.50, 40], // starting position
    zoom: 9 // starting zoom
});

// And now set up flash:
map.addControl(new Flash());

This sets up an element on the map that listens for a “mapbox.setflash” event.

Next the element that is listening has a class of .flash-message, so lets set up a little basic styling for it:

.flash-message {
  font-family: 'Ubuntu', sans-serif;
  position: relative;
  text-align: center;
  color: #fff;
  margin: 0;
  padding: 0.5em;
  background-color: grey;
}

.flash-message.info {
  background-color: DarkSeaGreen;
}

.flash-message.warn {
  background-color: Khaki;
}

.flash-message.error {
  background-color: LightCoral;
}

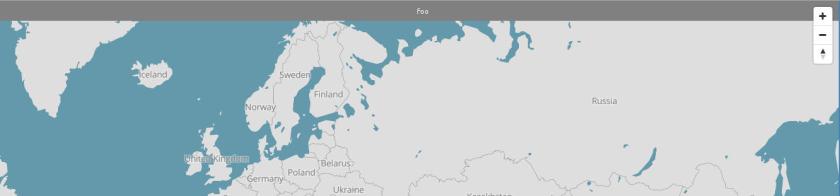
With that done lets fire an CustomEvent and see what it does.

document.dispatchEvent(new CustomEvent('mapbox.setflash', {detail: {message: "foo"}}))

foo_message

Ruby on Rails has three different kinds of flash messages: info, warn and error. That seems pretty reasonable so I’ve implemented that here as well. We’ve already set up some basic styles for those classes above and we can apply one of those classes by adding another option to out custom event detail object:

document.dispatchEvent(new CustomEvent('mapbox.setflash', {detail: {message: "foo", info: true}}))

document.dispatchEvent(new CustomEvent('mapbox.setflash', {detail: {message: "foo", warn: true}}))

document.dispatchEvent(new CustomEvent('mapbox.setflash', {detail: {message: "foo", error: true}}))

These events add the specified class to the flash message.

flash_message_classes

One final thing that I expect is for the flash message to fade out after a specified number of seconds. The is accomplished by adding a fadeout attribute:


document.dispatchEvent(new CustomEvent('mapbox.setflash', {detail: {message: "foo", fadeout: 3}}))

Lastly you can make the message go away by firing the event again with an empty string.

With a little CSS twiddling I was able to get the nice user-friendly notification I had in mind to let people know why there is no more data showing up.

flash-message

I’m pretty happy with how this turned out. Now I have a nice map specific notification that not only works in this project, but is going to be easy to add to future ones too.

Using mapbox-gl and webpack together

For those who might have missed it, Mapbox has been doing some very cool work to update the age old slippy-map to brand new world of WebGL. The library they have released to do this is mapbox-gl.

Webpack is a module bundler that reads the imports of your Javascript files and creates a bundled version by walking the dependency graph. Part of its appeal is the fact that it can do “code splitting”; creating bundles for specific pages as well as bundles for code shared across pages (Of course there’s more to it). Pete Hunt gives a great overview of it here.

So the big question is, what happens when you try to use this two awesome projects together?

ERROR in ./~/mapbox-gl/js/render/shaders.js
Module not found: Error: Cannot resolve module 'fs' in /home/mike/projects/usesthis/node_modules/mapbox-gl/js/render
 @ ./~/mapbox-gl/js/render/shaders.js 3:9-22

ERROR in ./~/mapbox-gl-style-spec/reference/v8.json
Module parse failed: /home/mike/projects/usesthis/node_modules/mapbox-gl-style-spec/reference/v8.json Line 2: Unexpected token :
You may need an appropriate loader to handle this file type.
| {
|   "$version": 8,
|   "$root": {
|     "version": {
 @ ./~/mapbox-gl-style-spec/reference/latest.js 1:17-37

ERROR in ./~/mapbox-gl-style-spec/reference/v8.min.json
Module parse failed: /home/mike/projects/usesthis/node_modules/mapbox-gl-style-spec/reference/v8.min.json Line 1: Unexpected token :
You may need an appropriate loader to handle this file type.

With a bunch flailing around and a little google-fu you also run into other fun errors like the “Uncaught TypeError: fs.readFileSync is not a function” or the dreaded “can’t read property ‘call’ of undefined” when you try to run this in your browser.

After playing around with loaders and config options before finding useful github issues, I thought I would for the benefit of my future self compile a simple working example, so I don’t have to figure this out again.

The goal here is to get Mapbox’s most basic example up and running with webpack.

Screenshot from 2016-02-24 14-43-47
The basic Mapbox-gl example.

Let create a directory to work in:

mkdir webpack-mapboxgl && cd webpack-mapboxgl

To do this we will divide the code from the example into two basic files; app.js for the javascript and index.html for the HTML.

First here’s index.html. Note that we are removing all the Javascript and in it’s place we are including the bundle.js that will be generated by webpack:

<!DOCTYPE html>
<html>
<head>
    <meta charset='utf-8' />
    <title></title>
    <meta name='viewport' content='initial-scale=1,maximum-scale=1,user-scalable=no' />
    <link href='https://api.tiles.mapbox.com/mapbox-gl-js/v0.14.2/mapbox-gl.css' rel='stylesheet' />
    <style>
        body { margin:0; padding:0; }
        #map { position:absolute; top:0; bottom:0; width:100%; }
    </style>
</head>
<body>

<div id='map'></div>
<script src="bundle.js"></script>
</body>
</html>

Next, app.js:

import mapboxgl from 'mapbox-gl'

mapboxgl.accessToken = 'pk.eyJ1IjoibWlrZXdpbGxpYW1zb24iLCJhIjoibzRCYUlGSSJ9.QGvlt6Opm5futGhE5i-1kw';
var map = new mapboxgl.Map({
    container: 'map', // container id
    style: 'mapbox://styles/mapbox/streets-v8', //stylesheet location
    center: [-74.50, 40], // starting position
    zoom: 9 // starting zoom
});

No real changes, just using the new ES2015 import syntax to pull in mapboxgl.
It’s probably a good time to install webpack globally:

npm install -g webpack

This is where is gets a little hairy. Obviously mapboxgl and webpack need to be installed, as well as babel and a mess of loaders and transpiler presets. That’s life in the big city, right?

I set up npm in the directory with npm init, and then the fun begins:

npm install --save-dev webworkify-webpack transform-loader json-loader babel-loader babel-preset-es2015 babel-preset-stage-0 babel-core mapbox-gl

Next is the secret sauce that knits it all together, the webpack.config.js file:

    var webpack = require('webpack')
    var path = require('path')

    module.exports = {
      entry: './app.js',
      output: { path: __dirname, filename: 'bundle.js' },
      resolve: {
        extensions: ['', '.js'],
        alias: {
          webworkify: 'webworkify-webpack',
          'mapbox-gl': path.resolve('./node_modules/mapbox-gl/dist/mapbox-gl.js')
        }
      },
      module: {
        loaders: [
          {
            test: /\.jsx?$/,
            loader: 'babel',
            exclude: /node_modules/,
            query: {
              presets: ['es2015', 'stage-0']
            }
          },
          {
            test: /\.json$/,
            loader: 'json-loader'
          },
          {
            test: /\.js$/,
            include: path.resolve(__dirname, 'node_modules/webworkify/index.js'),
            loader: 'worker'
          },
          {
            test: /mapbox-gl.+\.js$/,
            loader: 'transform/cacheable?brfs'
          }
        ]
      },
    }; }
    ]
  },
};

With that you should be able to run the webpack command and it will produce the bundle we referenced earlier in our HTML. Open index.html in your browser and you should have a working WebGl map.

If you want to just clone this example, I’ve put it up on Github.

Rethinking web development maxims

The increasing use of javascript frameworks is generating a lot of interesting discussions about some oft-quoted web development maxims. Most at issue are the ideas of progressive enhancement and unobtrusive javascript.

The argument advanced in these discussions is that we as web developers need to go back and revisit the assumptions that these maxims rest on to determine if they still have value.

To that end Tom Dale of Ember.js recently wrote a great article arguing that progressive enhancement is dead, pointing to Mozilla’s recent decision to remove the ability to disable javascript from the UI. While he makes a great argument, there are plenty of good arguments to the contrary to be found.

A more complicated question if raised by Angular.js. Doesn’t its requirement to specify behaviour via attributes on your DOM elements violate the unobtrusive javascript rule?

<div ng-click="doSomething()">...</div>

Brad Green and Shyam Sheshadri attempt to address this in their book “AngularJS” in a section called “A Few Words on Unobtrusive JavaScript”. After addressing some questions about being dependent on javascript, their finally raise (what I think of as) the main concern of unobtrusive javascript:

“5. These event handlers combine structure and behaviour. This makes your code more difficult to maintain, extend, and understand.”

Their answer to that is this:

There’s a simple acid test we can use to figure out if our system suffers from this coupling (between structure and behaviour): can we create a unit test for our app logic that doesn’t require the DOM to be present?

In Angular, yes we can write controllers containing our business logic without having references to the DOM.The problem was never in the event handlers, but rather in the way we needed to write JavaScript previously. Notice that in all the controllers we’ve written so far, here and elsewhere in this book, there are no references to the DOM or DOM events anywhere.

I’m still pondering that one. I’ve used Angular on a project and then removed it and I can tell you that it sure felt a lot like coupling to have to go and remove all the ng-whatever’s sprinkled throughout all of my views.

Misgivings aside, it’s definitely a good thing to go back and revisit the facts our conclusions rest on. Like the rest of life, there is unlikely to be a single shining “right answer”, but I think this is a conversation people in the web development world should be following.

Matrix transforms in SVG

Using a matrix to transform an element is a pretty big thing in SVG. Sadly most of the tutorials I have seen either trying to introduce you to matrix math or just omit dealing with matricies at all. This is a pretty sad state of affairs, so after needing to figure this out for one of my projects I figure I would try to fill that gap a little to make things easier next time I need to deal with this.

To keep this clear lets use an small set of elements:

<html>
<body>
<svg xmlns="http://www.w3.org/2000/svg">
  <g transform="scale(0.5)">
  <rect transform="translate(50,50)" id="rect" x=0 y=0 height=50 width=50 fill="blue" />
    </g>
  </svg>
</body>
</html>

A transform applied to a parent element will cascade down to its child elements. This means that in our example here the rect element in the middle will be both scaled AND translated since the scale(0.5) also applies to it.
With that in mind you can get a matrix that represents the sum of all the transformations on a given element by calling the getCTM (the Current Transformation Matrix) function:

svg = document.querySelector('svg') // the svg root element holds many helper functions we will need.
rect = document.querySelector("rect")
​​currentMatrix = rect.getCTM()
>SVGMatrix {f: 1.2132034355964265, e: -17.071067811865476, d: 1.4142135623730951, c: -1.414213562373095, b: 1.414213562373095…}

All SVG objects also have a list of transforms that have been applied to them. You can access it with the transform property:

rect.transform
>SVGAnimatedTransformList {animVal: SVGTransformList, baseVal: SVGTransformList}

So the goal it to manipulate that list to get the effect you are looking for. The least complicated thing you can do is simply append another transform to the existing list of transforms:

newTransform = svg.createSVGTransformFromMatrix(svg.createSVGMatrix().translate(150,50))
rect.transform.baseVal.appendItem(newTransform)

This will move the rect element 150 px to the left and 50 px down.

The other way to approach this would be to replace the existing transform(s) with a single new transform. You can accomplish that with the initialize function.:

rect.transform.baseVal.initialize(newTransform)

If we wanted to move our element to 750px while keeping everything else the same (and replacing all existing transforms), it might look something like this:

current_matrix = rect.getCTM()
>SVGMatrix {f: 25, e: 25, d: 0.5, c: 0, b: 0…}</div>
transformed_matrix = current_matrix.inverse().multiply(svg.createSVGMatrix().translate(750, 50).scale(0.5))
>SVGMatrix {f: 50, e: 1450, d: 1, c: 0, b: 0…}
rect.transform.baseVal.initialize(svg.createSVGTransformFromMatrix(transformed_matrix))
>SVGTransform {angle: 0, matrix: SVGMatrix, type: 1, setMatrix: function, setTranslate: function…}

Matricies can be a little hard on the head and understanding SOME matrix multiplication is very helpful. The tricky part is learning enough so you can get your project done without having to redo your whole high-school math curriculum. The best resource for a concise explanation is Coursera’s Machine Learning course. Check out the linear algebra review in section 3. He gets right down to business and explains it all really clearly.

Javascript and the end of history (of programming languages)

In 1989 Francis Fukuyama published the essay “The end of history?” which says:

What we may be witnessing is not just the end of the Cold War, or the passing of a particular period of postwar history, but the end of history as such: that is, the end point of mankind’s ideological evolution and the universalization of Western liberal democracy as the final form of human government.

I am not the first to notice that the programming world seems to be undergoing a similar shift, with the universalization of Javascript and its seeming adoption as the final form of programming.

The Mozilla platform (XUL, XPCOM, etc…) has long made it possible to develop desktop applications in Javascript (Firefox most famously) but radical changes have been afoot. Microsoft and the Gnome Foundation have both made Javascript their a central development language. On the mobile front Apache Cordova (formerly Phonegap), Firefox OS and other projects are ensuring steady growth of Javascript there.

Of course Node.js means that your server side code can now be written in Javascript as well. If you are wondering if how that is going, consider that Modulecounts reports that the npm package repository is growing faster even than Rubygems. On top of all that HTML 5 and standards like WebRTC and WebGL ensure that Javascript grows ever more powerful in the browser as well.

This is a curious shift to watch. Javascript is a pretty surprising choice for the “final form” of programming but here it is anyway, its adoption driven presumably by the number or programmers familiar with it from working with the DOM. Microsoft’s adoption seems is doubly curious; what would be the difference between Firefox OS and Windows when all/most apps are written in Javascript? It’s as though they are embracing Marc Andreessen’s famous prediction that “Windows will just be a buggy set of device drivers” and adding “and a Javascript API!”.

Does all this really spell the end for other languages? Is Javascript really taking over the world? It’s hard not to feel that way.

The famous philosopher Slavoj Žižek points out that where we used to see demands for Western-style democracy after every introduction of capitalism (and thus thought there was causation not just correlation), we are starting to see capitalism appear in stronger forms without democracy, giving a new form of political organisation. What he is getting at is that Fukuyama was wrong, history marches onwards after all.

When I look at projects on the border between Javascript and Ruby where authors are pressing each languages strengths and compensating for weaknesses, I think there is plenty more history to come in the world of programming. It just looks like the path to get there is going to be dominated by Javascript.