Mastodon

The difference between Feature Specs and Request Specs

Rspec has two different types of tests that are very similar to integration tests; request specs and feature specs. The difference between them has never been particularly clear to me and seems to be a point of confusion for many others as well.

Feature specs and Request specs are both are part of rspec-rails and are built on a similar foundation.

Request specs are built on top of Rails integration tests, which offer an API with methods that mirror what you find in HTTP: “get”, “put”, “post”, etc.
It gives you a “response” object for you to make your assertions against.

Feature specs are built on top of Capybara. The goal of Capybara is to offer an API that “simulates user behaviour”. To that end their API employs language that is not far from what you would use when directing someone to use a website over the phone:

visit '/sessions/new'
fill_in 'Login', :with => 'user@example.com'
fill_in 'Password', :with => 'password'
click_link 'Sign in'
page.should have_content 'Success'

Under the covers “visit” is just calling Rack::Test methods but there is no low-level, HTTP oriented language (request, response, get, put, etc…) used in the API itself. Capybara is consciously omitting them as Jonas Nicklas (Capybara’s author) explains on his blog.

Feature specs exist to provide a place for the type of high level testing that Capybara enables. The Relishapp site describes them as “high-level tests meant to exercise slices of functionality through an application. They should drive the application only via its external interface, usually web pages.” This unfortunately jargon-laden description, really only made sense after some digging.

Which brings us to Request specs. These are for those moments when the details of HTTP are exactly what you care about; like when you are testing an API.

get "/todays-forcast"
expect(response.body).to have_content "sunny"

Here the details of HTTP are front and centre, because in an API they matter. This is why request specs are referred to as ” a thin wrapper around Rails’ integration tests”, the focus is on providing just some Rspec sugar to use with the existing HTTP oriented methods.

The confusion around these things seem to stem from the early days of the project. When Capybara was first created it was intended to be used within request specs. That created a bunch of confusion because of the competing syntaxes ( get/visit, response/page) which resulted in the creation of feature specs to give a proper home to this type of testing.

Unfortunately people are still following old instructions and this usage is still common which muddies the water when trying to understand which is which. Hopefully this adds a little clarity.

Thoughts on teaching, and learning Ruby

I have 7 teachers in my immediate family and a step-mother that is teaching literacy and computer skills in Africa. Personally I have taught computer classes for seniors, and recently volunteered as a Ruby mentor with Ladies Learning Code in addition to sharing what I have learned with friends and loved ones. Teaching is a pretty big part of my world and consequently teaching programming has been on my mind a fair bit.

Lately I have started building some tools to support the ideas I have been rolling around and thought I would sketch out a rough lesson plan for someone’s first experience with Ruby that connects the ideas to the tools. I am putting it up here in hopes of getting some feedback and that it might be helpful to others.

Two things I have read really shaped my thinking about how learning happens and therefore how teaching should be done. The first is a brilliant article called The Cognitive style of Unix. The insight there is that “helpful” GUI software actually interferes with the process of internalizing the set of rules that govern the task at hand.

The second is this paragraph from Nicolas Carr’s book The Shallows:

Purely mental activity can also alter our neural circuitry, sometimes in far-reaching ways. In the late 1990s, a group of British researchers scanned the brains of sixteen London cab drivers who had between two and forty-two years of experience behind the wheel.

When they compared the scans with those of a control group, they found that the taxi drivers’ posterior hippocampus, a part of the brain that plays a key role in storing and manipulating spatial representations of a person’s surroundings, was much larger than normal.

Moreover, the longer a cab driver had been on the job, the larger his posterior hippocampus tended to be. The researchers also discovered that a portion of the drivers’ anterior hippocampus was smaller than average, apparently a result of the need to accommodate the enlargement of the posterior area.

Further tests indicated that the shrinking of the anterior hippocampus might have reduced the cabbies’ aptitude for certain other memorization tasks. The constant spatial processing required to navigate London’s intricate road system, the researchers concluded, is “associated with a relative redistribution of gray matter in the hippocampus.”

What I am seeing in this paragraph is that quality of explanation only counts for so much, learning is mostly a biological process. We are not waiting for a “Eureka!” moment, we are stimulating the growth of new biological material. That takes time and repetition.

With those things in mind, it seems to me that the goal when trying to teach something like Ruby is to explain as clearly as possible the rules that govern that world with plenty of opportunities for repetition. A key part of making repetition happen aiming to make the learner autonomous as quickly as possible.

Theory is great but what would implementation look like? From my experience it seems there are two distinct “worlds” whose rules must be internalized for someone to start feeling comfortable with Ruby, the Unix command line and Ruby itself.

Learning the command line:

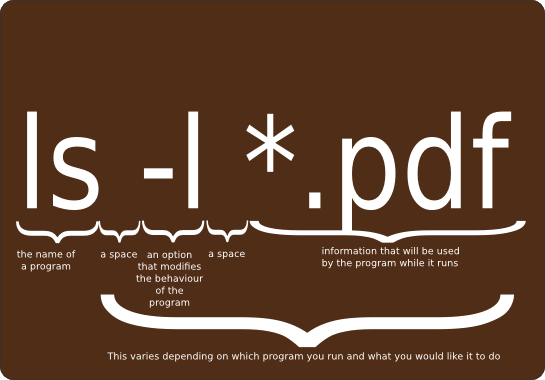
Have given a few people their first look at a command line, I have noticed that it is difficult for them to understand what it is they are looking at. They are thrust into a black and white world (aubergine and white if you are on Ubuntu) with no indication of what to do next. Relevant terminology to define at this point would be path, command/program and probably variable. Then you can focus on the rules that govern this world; the command line equivalent of physics. First it seems to need to understand what running a program looks like since that is the root of everything:

ls_command

Following that general structure offers a template that learners should be able use to understand things like:

cd
cat ~/Documents/foo.txt
ls -al
grep -ri kittens .

The other rule that shapes this world is that all programs are searched for, and hopefully found, in one of the folders that is contained (in a comma separated list) in a variable called $PATH. Even though the echo command is unfamiliar, learners should have some intuition about the meaning of:

echo $PATH

A few experiments with the “which” command (ex: which ls) should go a long way to helping internalize the rules of this world and build a set of expectations that will help learners understand output like:

mike@sleepycat:~☺  blah
No command 'blah' found, did you mean:
Command 'blam' from package 'blam' (universe)
blah: command not found

All of this information is really just building towards allowing learners to understand the following statements:

mike@sleepycat:~☺  ruby -e "puts 'hello world'"
mike@sleepycat:~☺  ruby ./hello_world.rb

With that we have a toehold in a new world and can work on understanding the rules that govern that.

Learning Ruby:

Teaching beginners Ruby is tough because you are constantly walking a fine line between providing accurate information and glossing over overwhelming detail. This part is a little less clearly defined, partly because of the complexity, partly because I am still exploring the ideas. One thing is clear to me though: because everything is an object in Ruby there is no way to duck the difficult topic of classes and objects. You have to deal with it pretty much right away.

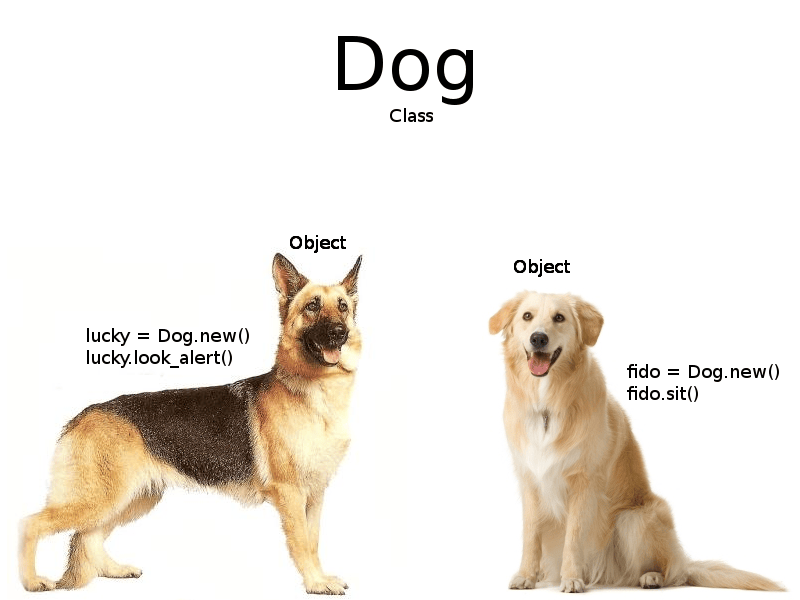
Unfortunately it’s fairly common to start with something like this: class_vs_object
I say unfortunately because it has already raced past the basics physics of the Ruby world: on every line you will see some variation of thing dot action.

___________.__________()

Once learners have taken a long look at that basic structure then they should be able cope a little better with looking at an actual line of Ruby. Pressing home that point we could now use that dog image to highlight the basic structure: .new(), .look_alert() and .sit() are all behaviours known as methods attached to the object on the left of the dot. Things on the left of a dot are either a blueprint or an thing made from a blueprint.

The seeming exceptions to this rule where behaviour seems to happening without an object (think puts and all the other Kernel methods included in the main object) are because we are inside an object and that object (aka self) is the one understood to be receiving that call to action. Most likely it is preferable to opt for specifying things like puts in its more verbose form Kernel.puts.

With that information learners should be able to make sense of the following examples:

mike@sleepycat:~☺  ruby -e "Kernel.puts 'hello world'"
mike@sleepycat:~☺  ruby -e "Kernel.loop {Kernel.puts 'hello world'}"
mike@sleepycat:~☺  ruby -e "Kernel.puts(Kernel.eval('1 + 1'))"
mike@sleepycat:~☺  ruby -e "Kernel.puts(Kernel.gets())"

Note that all of those are run with the Ruby command to reinforce the earlier learning of the command line. However after each command is run we are kicked rudely out of the world of Ruby but if we combine them we can stay inside it:

mike@sleepycat:~☺  ruby -e "loop { puts(eval(gets())) }"

That little bit of genius (which I have written about before) is taken directly from Josh Cheek and is a brilliant way to demystify what is often (unfortunately) the peoples first step into Ruby, playing with IRB. Now with a little grounding learners should be able to make sense of what they see there.

Exploring further:

IRB suffers the same problem as the command line: there is no obvious way to discover what to do. There is tonnes of information that would be useful to building a clear mental model of how the world of Ruby works but none of it is readily accessible to beginners. I decided to take a stab at fixing this by creating a gem called explore_rb.

It adds methods to the main object to display all available classes, all objects in memory and a few other things. Since being dropped into IRB is a lot like being shut in a darkened room, those methods allow you to explore the contents of the room. For a description of its methods you can see the readme.

We can use explore_rb to show the differences between classes and objects (the difference between a blueprint and something made using that blueprint):

mike@sleepycat:~☺  irb
irb(main):001:0> require 'explore_rb'
Use the following commands to look around:
classes, objects, get_objects, symbols, local_variables, gems, draw_this, help
=> true
irb(main):002:0> classes.include? :Cat
=> false
irb(main):003:0> get_objects Cat
NameError: uninitialized constant Cat
	from (irb):4
	from /home/mike/.rbenv/versions/2.0.0-p0/bin/irb:12:in `<main>'
irb(main):004:0> class Cat; end
=> nil
irb(main):005:0> classes.include? :Cat
=> true
irb(main):006:0> get_objects Cat
=> []
irb(main):007:0> Cat.new
=> #<Cat:0x007f8c411c49c0>
irb(main):008:0> get_objects Cat
=> [#<Cat:0x007f8c411c49c0>]
irb(main):009:0> Cat.new
=> #<Cat:0x007f8c411cf870>
irb(main):010:0> get_objects Cat
=> [#<Cat:0x007f8c411c49c0>, #<Cat:0x007f8c411cf870>]

Additionally explore_rb can help visualize the execution of our programs. This is a big help when explaining functions/methods and return values. An example would be:

irb(main):022:0> class Cat
irb(main):023:1> def initialize name
irb(main):024:2> @name = name
irb(main):025:2> end
irb(main):026:1> def name
irb(main):027:2> @name
irb(main):028:2> end
irb(main):029:1> def vocalize
irb(main):030:2> "#{name} says miaow"
irb(main):031:2> end
irb(main):032:1> end
=> nil
irb(main):033:0> cat1 = Cat.new("Chatoune")
=> #<Cat:0x007f39f74c1818 @name="Chatoune">
irb(main):034:0> draw_this { cat1.vocalize }
File saved in /home/mike/Desktop.
=> nil

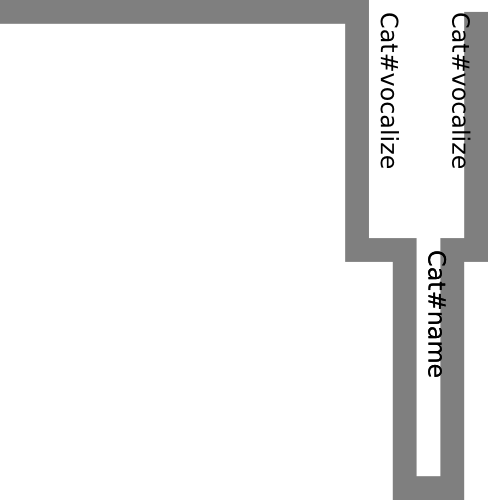
Which gives us the following image:
trace

Now we have a visual showing the interpreter moving in and out of our methods. You can see it will drop into a method to process the instructions within and return from the method.

We can see it drop into the vocalize method, and then have to drop down into the name method to carry out the instructions there before returning to complete the sentence that vocalize is supposed to return.

At this point I think things get more free form and as long as the emphasis is on building up a solid set of expectations around how the world of Ruby works its really up to the mentor to read their audience and give them what they need. Ruby is a great language in terms of consistancy since it was designed from the ground up to be object oriented, rather than having object orientation grafted awkwardly on later, so that should really help the learning process.

While there are exceptions and caveats for everything I have said above I think exposing people to exceptions before they have internalized the rule can only damage the learning process. Where exceptions to the rules are revealed through experimentation (“why doesn’t ‘which cd’ return anything?”, “if I create objects with .new and 1 is an object why can’t I say Fixnum.new(1)?”) emphasising the what expectations still hold true is probably the most important thing you can do. It takes a lot of learning before you can appreciate stuff like this.

If you have something that has really helped your learning process let me know in the comments.
Ruby Redo’s: Sinatra

Sinatra is described as “a DSL for quickly creating web applications” and since I have been playing with DSLs lately I thought I would try my hand at making something like it. You can see in Sinatra’s famous three line “Hello World” that they are calling get directly on the top-level object called main:

require 'sinatra'

get '/hi' do
  "Hello World!"
end

So first thing we know is that we need a Rack compatible class. Why do we know that? Because Rack deals with the webserver/HTTP stuff as long as we follow their interface spec which saves us a lot of fussing with servers. The spec is simple:

A Rack application is a Ruby object (not a class) that responds to call. It takes exactly one argument, the environment and returns an Array of exactly three values: The status, the headers, and the body.

So that actually tells us a fair bit about the class we need to write. As the saying goes, “There are only two hard things in Computer Science: cache invalidation and naming things”, I think I will name this thing HTTP. So here is the minimum to conform with the Rack spec:

class HTTP
  def call env
    [200, {}, ""]
  end
end

If you are curious about what kind of stuff is going to end up in that env variable here is an example:

{
 "SERVER_SOFTWARE"=>"thin 1.5.0 codename Knife",
 "SERVER_NAME"=>"localhost",
 "rack.input"=> StringIO.new(),
 "rack.version"=>[1, 0],
 "errors"=>STDERR,
 "rack.multithread"=>false,
 "rack.multiprocess"=>false,
 "rack.run_once"=>false,
 "REQUEST_METHOD"=>"GET",
 "REQUEST_PATH"=>"/test",
 "PATH_INFO" => "/test",
 "REQUEST_URI"=>"/test",
 "HTTP_VERSION"=>"HTTP/1.1",
 "HTTP_USER_AGENT"=>"curl/7.27.0",
 "HTTP_HOST"=>"localhost:8080",
 "HTTP_ACCEPT"=>"*/*",
 "GATEWTERFACE"=>"CGI/1.2",
 "SERVER_PORT"=>"8080",
 "QUERY_STRING"=>"",
 "SERVER_PROTOCOL"=>"HTTP/1.1",
 "rack.url_scheme"=>"http",
 "SCRIPT_NAME"=>"",
 "REMOTE_ADDR" => "127.0.0.1"
}

Rack actually has a bunch of helpful classes that we are going to use to get thing working, lets add them in:

require 'rack'

class HTTP

  def call env
    request = Rack::Request.new env
    response = Rack::Response.new
    response.write "Hello Whirled"
    response.finish
  end

end

at_exit do
  Rack::Handler.default.run HTTP.new
end

You can see that we now have request (that wraps the environment hash that you can see us passing in) and a response object. Notice that response.finish is the last line of the call method now. This is because it returns the array of status, headers and body that Rack needs. The other thing to notice is that we are using Kernel#at_exit to run whatever Rack decides is the default webserver when the script exits. This actually gives us a working application that you can run like this:

mike@sleepycat:~/play/http$ ruby http.rb
>> Thin web server (v1.5.0 codename Knife)
>> Maximum connections set to 1024
>> Listening on 0.0.0.0:8080, CTRL+C to stop

Lets take another step and get that response.write out of there and put it in a Proc. Next, we use instance_eval to evaluate the Proc (which is being turned from a proc object back into a block with the & operator) in the context of the current object. Since the block is being evaluated in the context of the current object and not the context of the current method we need to make request and response instance variables and add some attr_accessor methods. You can see also that we are now storing the routes in a hash of hashes that is held in a class variable so that when we call new, our instance can still see the routes.

require 'rack'

class HTTP

  attr_accessor :request, :response

  @@routes = { get: {"/" => Proc.new {response.write "Hello Whirled"}} }

  def call env
    @request = Rack::Request.new env
    @response = Rack::Response.new
    the_proc = @@routes[:get]["/"]
    instance_eval &the_proc
    response.finish
  end

end

at_exit do
  Rack::Handler.default.run HTTP.new
end

Our next step is creating some way to add methods to that @@routes hash. For that we will create a class method called save_route. We’ll also add some other methods to the hash as well and make sure that if there is no block found for a url that we send back a 404:

require 'rack'

class HTTP

  attr_accessor :response, :request

  @@routes = { get: {}, put: {}, post: {}, delete: {}, patch: {}, head: {} }

  def self.save_route *args
    method, route, block = *args
    @@routes[method.downcase.to_sym][route] = block
  end

  def call env
    puts "Handling request for: #{env["PATH_INFO"]}"
    @request = Rack::Request.new env
    @response = Rack::Response.new
    block = @@routes[request.request_method.downcase.to_sym][request.path_info]
    # if no block is stored for that path; 404!
    block ? instance_eval(&block) : throw_404
    response.finish
  end

  private

  def throw_404
    @response.status = 404
    @response.write "<html>Page Not Found</html>"
  end

end

at_exit do
  Rack::Handler.default.run HTTP.new
end

Now that we can add routes to our class, we need to turn our attention to adding methods to the main object. The methods we want to add are the usual HTTP methods, get, put and whatnot.
We want to define an method for each of them like this:

def get *args, &block
  HTTP.save_route(:get, args.first, block)
end

But since that is kind of repetitive we are going to write some code that writes that code. Often you would use Module#define_method for this but the main object is weird and does not have that method. So I am going to use eval:

require 'rack'

class HTTP
  #... all the HTTP code ...
end

def http_methods
  %w(get put post delete head patch).each do |method_name|
     eval <<-EOMETH
     def #{method_name} *args, &block
       HTTP.save_route(:#{method_name}, args.first, block)
     end
     EOMETH
   end
end

at_exit do
  # ... rack stuff ...
end

Then we need to open the eigenclass of main and attach the methods to that. This is so the methods are available as instance methods of the main object. We can do that with Ruby’s somewhat bizarre syntax:

require 'rack'

class HTTP
  #... all the HTTP code ...
end

def http_methods
  #... all the HTTP code ...
end

class << self
  http_methods
end

at_exit do
  # ... rack stuff ...
end

With that we now have a working toy version of Sinatra. We can use it like this:

require_relative 'http'

get "/" do
  response.status = 200
  response["HTTP-Referrer"] = "Mike"
  response.write "<html>Hello Whirled</html>"
end

When you are working in Rails you often hear about Rack but its not usually something you interact directly with. Playing with this has really made me appreciate Sinatra for the intelligent, concise DSL that it is (which is easy to forget somehow). While playing with DSLs is fun, taking some time to get to know Rack has also really helped my understanding of Rails.

Duck typing in Ruby: thoughts on checking argument types.

It doesn’t take much time in the Ruby world to hear the term duck typing. It wasn’t until I was writing a method for a recent project that was to accept either one or many ids that I actually stopped and actually investigated it. I knew what most people know about it: “If it walks like a duck and quacks like a duck, then it’s a duck” and that in actual practice this means you call call respond_to? to see if a method exists.

But as I was working on the code I found I kept wanting to type object.kind_of?(Array) but since this seemed to clash with the idea of duck typing I thought it was time to investigate a little bit.

The reason the type of an object using #kind_of? is not that useful is that Ruby supports multiple inheritance via the inclusion of modules. Since an object’s methods may have come from either a parent class or an included module, knowing the objects class doesn’t provide much information. If Tiger.new.kind_of?(Felidae) just returned true, is it safe to call the #domesticated? method? Calling #kind_of? just doesn’t help you make that decision.

module Wild
  def domesticated?
    false
  end
end

class Felidae
  def claws?
    true
  end
end

class Tiger < Felidae
  include Wild
end

It seems that there are two schools of thought on duck typing. First, “soft” duck typing. Paraphrasing an example from Dave Thomas’ pickaxe book shows the standard approach:

def some_method param
  if param.respond_to? :<<
    # must be something we can write to!
    param << "a string to be added"
  end
end

The difficulty here is that respond_to? famously fails when you are using method_missing to catch and respond to method calls. The only way to be sure that respond_to? is not deceiving you is to go ahead and call the method. It is this approach that people call “hard” duck typing:

def some_method param
  param << "a string to be added"
end

As Dave explains:

“You don’t need to check the type of the arguments. If they support << (in the case of result) or title and artist (in the case of song), everything will just work. If they don’t, your method will throw an exception anyway (just as it would have done if you’d checked the types). But without the check, your method is suddenly a lot more flexible: you could pass it an array, a string, a file, or any other object that appends using <<, and it would just work.”
— Programming Ruby second edition pg 355 – Dave Thomas

The interesting thing to me here, is the rationale for just calling the method instead of doing something like this:

def some_method param
  begin
    param &lt;&lt; &quot;a string to be added&quot;
  rescue NoMethodError =&gt; e
    raise ArgumentError, &quot;Needs to support the &lt;&lt; method&quot;
  end
end

Constantly wrapping method calls in begin/rescue/end is pretty heinous from any angle; aesthetics, readability or performance. While hard duck-typing might come off as a little cavalier, it’s pretty much assumed in the Ruby community you have a test suite to make sure none of these NoMethod exceptions end up in production.

Another interesting take on the issue is the approach taken by Jeremy Kemper, the top commiter to the Rails framework. With commit 609c1988d2e274b he added the #acts_like? method to Object:

class Object
  # A duck-type assistant method. For example, Active Support extends Date
  # to define an acts_like_date? method, and extends Time to define
  # acts_like_time?. As a result, we can do &quot;x.acts_like?(:time)&quot; and
  # &quot;x.acts_like?(:date)&quot; to do duck-type-safe comparisons, since classes that
  # we want to act like Time simply need to define an acts_like_time? method.
  def acts_like?(duck)
    respond_to? :&quot;acts_like_#{duck}?&quot;
  end
end

and then to each of the core classes in the standard library he added an acts_like_x? method. Here is what the one for Date looks like:

class Date
  # Duck-types as a Date-like class. See Object#acts_like?.
  def acts_like_date?
    true
  end
end

These were added to ActiveSupport back in 2009 but for some reason they don’t seem to be widely used in the codebase. This surprises me because this approach seems to avoid NoMethodErrors without cluttering your code with rescue statements. On top of that it has none of the problems inherent in respond_to?.

I hope that helps people out a little. I know it has helped clarify my thoughts. Just one more reason to go and read the source.

Ruby redo’s: The Rails router

One of the things that Ruby is famous for is the ease with which you can build Domain Specific Languages (DSLs). The routing DSL in Rails is one of the more recognizable features of the framework and a good example of a Ruby DSL. If you’ve worked with Rails at all you have seen this in config/routes.rb:

MyApp::Application.routes.draw do
  match &quot;/foo&quot;, to: &quot;foo#bar&quot;
end

I’ve worked with Rails a fair bit and had a pretty good understanding of how to use the DSL but there is always more to be learned by implementing it (or something like it) yourself. So what are we implementing? We want something that behaves like the ActionDispatch Routeset:

[27] pry(main)&gt; Rails.application.routes
=&gt; #&lt;ActionDispatch::Routing::RouteSet:0x0000000232c588&gt;
[28] pry(main)&gt; Rails.application.routes.draw do
[28] pry(main)*   match &quot;/foo&quot;, to: &quot;bar#baz&quot;, via: :get
[28] pry(main)* end
=&gt; nil

So we can see that it has a draw method that accepts a block. That block contains a call to the method “match” and accepts a string and a hash of arguments. We called the match method in our code block above and passed that block to the draw methods. When match is evaluated it adds the given route to the set of routes for the application. Which means that if we dig into the routes we should find our path we specified (/foo). Sure enough:

[29] pry(main)&gt; Rails.application.routes.router.routes.each{|r| puts r.path.spec};nil;
/assets
/foo(.:format)
/rails/info/properties(.:format)

As with most things in Ruby, its actually surprisingly little code to get such a thing working:

class RouteSet

  def initialize(routes = {})
    @routes = routes
  end

  def match(path, options)
    @routes[path]= options
  end

  def draw(&amp;block)
    instance_eval &amp;block
  end

  def to_s
    puts @routes.inspect
  end

end

We can play with it in Pry:

mike@sleepycat:~/projects/play$ pry -I.
[1] pry(main)&gt; load 'routes.rb'
=&gt; true
[2] pry(main)&gt; routeset = RouteSet.new
{}
=&gt; #&lt;RouteSet:0x1561598&gt;
[3] pry(main)&gt; routeset.draw do
[3] pry(main)*   match &quot;/foo&quot;, to: &quot;bar#baz&quot;, via: :get
[3] pry(main)* end
=&gt; {:to=&gt;&quot;bar#baz&quot;, :via=&gt;:get}
[4] pry(main)&gt; routeset.to_s
{&quot;/foo&quot;=&gt;{:to=&gt;&quot;bar#baz&quot;, :via=&gt;:get}}
=&gt; nil

The secret DSL sauce is all in the draw method. Notice the ampersand in front of the block parameter:

  def draw(&amp;block)
    instance_eval &amp;block
  end

That ampersand operator wraps an incoming block in a Proc and then binds it to a local variable named block. The same operator is used to reverse that process, turning the contents of the block variable from a Proc back into a block. That block is then fed into instance_eval which evaluates the block in the context of the current object. The net effect is the same as if you had just written this:

  def draw
    match &quot;/foo&quot;, to: &quot;bar#baz&quot;, via: :get
  end

This process of taking a block of code defined somewhere and evaluating it in some other context is the key to DSLs in Ruby. Understanding the ampersand operator and its conversion between blocks and Procs is really important since this is really common in Ruby code. While is may be common, its not cheap. All that “binding to variables” stuff can be slow so in those moments where you care about speed you will want to use this instead:

  def draw
    instance_eval &amp;Proc.new
  end

Playing with this stuff has really helped my understanding of both Ruby and Rails. I hope it helps you too.

Ruby redo’s: IRB

I have come to the realization that the best thing you can do to advance your Rails knowledge is to get better at Ruby. Rails development tends to keep you in one particular corner of the language. To see the other parts you really need to step off Rails’ golden path and try writing something from scratch yourself.

To push myself into some interesting territory I have taken to creating toy implementations of some of the programs I use but have never really understood the internals of. Every time I do this I find I learn something new… sometimes something big, sometimes something small.

One of the small ones actually started with switching from IRB to Pry, and seeing the mind blowing simplicity of Josh Cheek’s example Read Evaluate Print Loop (REPL):

loop do
  puts eval gets
end

When he showed that I nearly fell out of my chair. I’ve been using the Rails console for years now and had never really stopped to consider how it actually did what it does. Obviously IRB is a bit more more involved than a one-liner and a gemspec but this is one of those magic code examples that gets the concept across with searing clarity.

A learning opportunity is not far off either since its not long before you will get the urge to improve it after fat-fingering something and the having it exit. If you don’t know about Ruby’s Exception hierarchy, or like me needed a reminder because you have spent to much time with Rails, try adding some error handling catching the Exception class:

loop do
  begin
    puts eval gets
  rescue Exception =&gt; e #Not a good idea!
    puts e.message
  end
end

Of course you will soon realize that you can’t end the program since it turns out that Kernel#abort just calls Kernel#exit and that actually exits the program by raising a SystemExit Error… which we just caught. Oops.
After discovering the joy of Kernel#exit! and doing some reading about the Exception hierarchy (Ahhaa StandardError!) I have to say that redoing even seven lines of IRB taught me a lot.

Getting to know rbenv

I’ve been flirting with switching to rbenv for a while now. Updating RVM recently left me with a strange and annoying error (rubygems_bundler_installer LoadError) that I decided was best fixed by finally moving to rbenv.
The setup was pretty painless but after installing ruby 1.9.3 I thought I would install bundler and get to some coding. So I ran “gem install bundler” which went fine and then “bundle install”. What I got was:

mike@sleepycat:~/projects/capoeiraottawa.ca☺ bundle install
The program 'bundle' is currently not installed. You can install it by typing:
sudo apt-get install ruby-bundler

After a little reading rehashing was suggested and solved the problem:

mike@sleepycat:~/projects/capoeiraottawa.ca☺ rbenv rehash
mike@sleepycat:~/projects/capoeiraottawa.ca☺ bundle install
Fetching gem metadata from http://rubygems.org/......

Since I had no idea what rehash meant, or why I would need to use it. Since rehash seems to be a big thing with rbenv this gave me a good reason to get to know rbenv a little better. It actually works by prepending ~/.rbenv/shims and ~/.rbenv/bin to your path so its binaries are found first. Those binaries are shims based on the rubies and gems in the ~/.rbenv/versions directory. Rehash calls the following instructively named function to do create them:


make_shims ../versions/*/bin/*

The result is a shims directory full of shims. I’ve heard the term used many times but I have to admit I had a pretty shaky understanding of what a shim actually was. Taking a look in the directory helped…


mike@sleepycat:~/.rbenv☺ ls shims/
ast bundle erb gem irb jgem jirb jirb_swing jruby jrubyc rake rdoc ri ruby testrb update_rubygems

Even better is seeing the code:


mike@sleepycat:~/.rbenv☺ cat shims/bundle
#!/usr/bin/env bash
set -e
export RBENV_ROOT="/home/mike/.rbenv"
exec rbenv exec "${0##*/}" "$@"

So all that’s happening is setting an environmental variable and then execute some other command. OK, suddenly its clear what a shim is. As it happens rbenv exec is basically the same thing, setting some variables and then executing the actual command.

So when I install new gems, and those gems have a bin directory I need to call “rbenv rehash” to have rbenv generate new shims for the binaries they contain. Curiosity satisfied.

Removing restrictions from PDFs

My girlfriend recently sent me a PDF that she needed to print. She had tried to strip off the printing restrictions using the site I made for that purpose but it hadn’t worked. I quickly realised that my site, which is really a web front end on Ghostscript would not be able to deal with that particular PDF because it was encrypted.

Interestingly, it seems that the Ghostscript project has been making steady progress since I first made that site and can now remove encryption as well as the usual usability frustrations my girlfriend was dealing with; printing and copy/paste restrictions. After a bit of an update it is now cheerfully removing encryption too!

So in the spirit of “do things, tell people”, here is where to go next time you have a difference of opinion with a PDF file: http://pdf-permissions-remover.com/

If you are interested in the code you can find it on Github: https://github.com/sleepycat/pdfstripper

Running a Sinatra app on Glassfish

I’m using JRuby more and more these days to deploy Rails apps. Typically that means creating a war file and deploying it on Glassfish. Yesterday I had request that seemed would be best fulfilled with a Sinatra app rather than Rails. It was my first experience getting Sinatra running on Glassfish and I thought I would share it.

The goal state here is a war file in the Glassfish autodeploy directory and the tool of choice is Warbler.


gem install warbler

With that installed we need to get ourselves set up to warble something. Warbler expects a specific directory structure it turns out, which is pretty typical for those familiar with the Ruby/Rails world:


mike@sleepycat:~/projects/myapp☺ find .
./Gemfile
./config.ru
./lib
./lib/myapp.rb
./Gemfile.lock

Of course you can add a views directory and other stuff in there as well. If you start doing things that Warbler does not expect you might have to add a warble.rb file but since I am using bundler and doing things that fall within warblers expectations I didn’t need one. I had a small number of very simple views, so I chose not to make a views directory and opted for named templates in the main app. To make this a little easier to digest, I’ve stripped out my code and made a basic hello world style app below thats going to be my starting point for next time I do this sort of thing. The three pieces you need are the Gemfile, the rackup file and the app itself.

The Gemfile:


source 'http://rubygems.org'

gem ‘sinatra’

group :development do
gem “sinatra-reloader”
gem “ruby-debug”
end

The config.ru


require 'rubygems'
require 'bundler'
Bundler.require
require 'lib/myapp'

set :run, false #disable the built-in web server
set :environment, :production

run Sinatra::Application

And, sitting inside the lib directory, the application itself with a named template:


get '/' do
@greeting = “Bonjour”
status 200
erb :index
end

template :index do
“<%= @greeting %> from Sinatra”
end
end

If you want to try it out at this point you can launch the app using rackup:


rackup config.ru

With those files in place you are ready to create a war file by running the “warble” command in the project directory. What that does is create a war file with the following structure:


./META-INF
./META-INF/init.rb
./META-INF/MANIFEST.MF
./WEB-INF
./WEB-INF/web.xml
./WEB-INF/Gemfile
./WEB-INF/config.ru
./WEB-INF/lib
./WEB-INF/lib/jruby-rack-1.1.5.jar
./WEB-INF/lib/jruby-core-1.6.7.jar
./WEB-INF/lib/jruby-stdlib-1.6.7.jar
./WEB-INF/lib/myapp.rb
./WEB-INF/gems
./WEB-INF/gems/specifications
...all the gemspecs from the gem dependencies end up here...
./WEB-INF/gems/gems
... All the gems that your project depends on are copied in to this folder ...
./WEB-INF/Gemfile.lock

And now you can drop that war in the Glassfish autodeploy directory and off it goes. My app was simple enough that I didn’t even need to use a database so you might need to add to this a little but it looks pretty simple. In fact every time I end up using Sinatra I come away impressed by how clean and simple it is. Now that I know how to run this on Glassfish, the next time may come sooner than later.

Sqlite: Failed to build gem native extension

I just stumbled across this error in mid-yak-shave for one of my projects. While trying to get my app up and running to test something I get the usual native extensions whining:

Installing sqlite-ruby (2.2.3) with native extensions
Gem::Installer::ExtensionBuildError: ERROR: Failed to build gem native extension.

/home/mike/.rvm/rubies/ruby-1.9.2-p290/bin/ruby extconf.rb
checking for main() in -lsqlite… no
checking for sqlite.h… no
*** extconf.rb failed ***
Could not create Makefile due to some reason, probably lack of
necessary libraries and/or headers. Check the mkmf.log file for more
details. You may need configuration options.

After a you see this sort of thing a few times you pretty instinctively bang out the command:

sudo apt-get install libsqlite3-dev

I was pretty takenaback to get the same error after installing the dev libraries. It turns out that I was installing the gem “sqlite-ruby” when I needed “sqlite3” is what you need if you are using Ruby 1.9.2.