Mastodon

Making Virtual Machines with KVM and Virt-manager

I have used virtual machines for a quite a while now and have drifted back and forth between VMware and Virtualbox. While my initial experience of Virtualbox was good, between the acquisition by Oracle, the TAINT_CRAP thing and generally finding it slow and sometimes overly complicated, I thought I would explore some other options. Having recently discovered my laptop supports hardware virtualization, I thought I would try out KVM.

KVM stands for Kernel-based Virtual Machine and Ubuntu’s documentation sums up the expected uses nicely; “Ubuntu uses KVM as the back-end virtualization technology primarily for non-graphic servers”. So while this is definitely created with servers in mind, I figure I will explore using it as a Virtualbox replacement and see how that goes.

So after enabling virtualization in my BIOS I installed all the packages:


sudo apt-get install virt-manager qemu-kvm libvirt-bin ubuntu-vm-builder bridge-utils
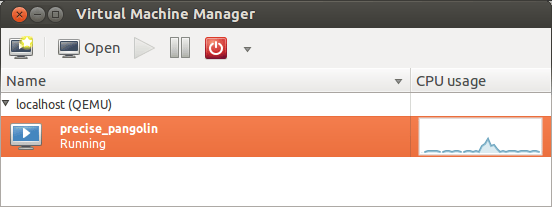
The first thing I learned after starting virt-manager is that KVM is using QEMU as its processor emulator. This becomes obvious when you launch virt-manager and notice that it can’t connect to QEMU on localhost.
To get that working just add yourself to the libvirtd group. I did it manual style:


sudo vim /etc/group

and add yourself to the group like so:


libvirtd:x:128:mike

After that you will need to logout and log back in (restarting works too) and you should see localhost(QEMU) in the virt-manager GUI indicating that a connection has been made.

The process of setting up a virtual machine is similar to what you would find in VMWare or Virtualbox. Just click the “Create new virtual machine” button and its pretty self explanatory. One thing that stood out as a little concerning is an little red error icon when setting up the network config.

If you mouse over it, it says “could not initialize HAL for interface listing”. HAL of course has been deprecated and removed from Ubuntu (and replaced by Udev) so its not a surprise that it can’t be found. I wasn’t sure what to make of this but it turns out not to be an issue; the VM boots up happily and is able to sort out a network connection just fine.
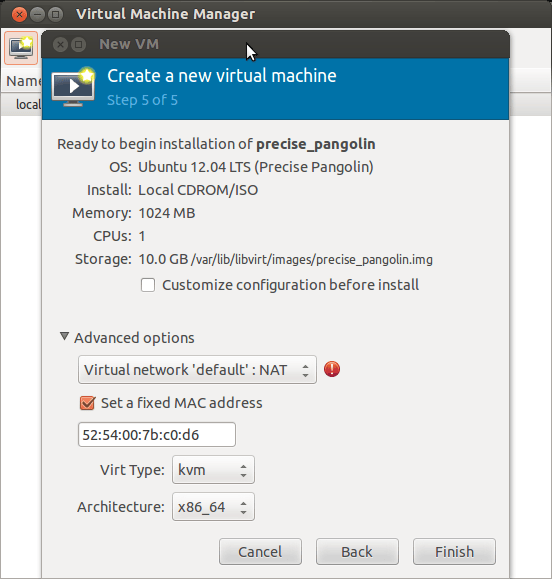
HAL error in virt-manager
I am curious to see what it will be like to work with this for a while. Particularly doing things like using the VM as a server of various kinds which is terribly clunky in with Virtualbox. Well I still have lots of tinkering to do but this is enough to get the experiment underway.

Getting Sikuli running on Ubuntu

I have been wanting to play with the automation tool Sikuli for a while now. The few minutes I have dedicated to it have ended in frustration and promising myself that I would sit down and make a serious attempt at it some evening soon.

That evening finally happened. My attempts at the simplest script had ended each time with the error:


[error] Stopped [error] Error message: Traceback (innermost last): (no code object) at line 0 SyntaxError: ('future feature with_statement is not defined', (' ', 1, 6, ''))

A little duckduckgoing revealed that the problem is that the Ubuntu/Debian repositories have a old version of Jython which is causing Sikuli problems. It took a little experimentation (and upgrading both Sikuli and Jython) but this is what got my Sikuli script working:


wget -O jython_installer-2.5.2.jar http://downloads.sourceforge.net/project/jython/jython/2.5.2/jython_installer-2.5.2.jar?r=http%3A%2F%2Fwiki.python.org%2Fjython%2FDownloadInstructions&ts=1331868765&use_mirror=voxel

java -jar jython_installer-2.5.2.jar #run through the installer, I installed it into my home directory...

sudo ln -s /home/mike/jython2.5.2/jython /usr/local/bin/jython #then I created a link to it in my path

sudo apt-get install libcv2.1 libcvaux2.1 libhighgui2.1 # install some of the computer vision libraries Sikuli uses

Once that setup was done, I also downloaded and unzipped the latest version of Sikuli and then ran the script to start the ide:


Sikuli-X-1.0rc3 (r905)-linux-x86_64/Sikuli-IDE/sikuli-ide.sh

And it worked! Now I can finally experiment!

Sqlite: Failed to build gem native extension

I just stumbled across this error in mid-yak-shave for one of my projects. While trying to get my app up and running to test something I get the usual native extensions whining:

Installing sqlite-ruby (2.2.3) with native extensions
Gem::Installer::ExtensionBuildError: ERROR: Failed to build gem native extension.

/home/mike/.rvm/rubies/ruby-1.9.2-p290/bin/ruby extconf.rb
checking for main() in -lsqlite… no
checking for sqlite.h… no
*** extconf.rb failed ***
Could not create Makefile due to some reason, probably lack of
necessary libraries and/or headers. Check the mkmf.log file for more
details. You may need configuration options.

After a you see this sort of thing a few times you pretty instinctively bang out the command:

sudo apt-get install libsqlite3-dev

I was pretty takenaback to get the same error after installing the dev libraries. It turns out that I was installing the gem “sqlite-ruby” when I needed “sqlite3” is what you need if you are using Ruby 1.9.2.

Installing Crayon Physics Deluxe on Ubuntu Natty

I was excited to see Crayon Physics Deluxe included in the latest edition of the Humble Bundle. When I downloaded it I was a little thrown off when I realized that I was not getting a .deb file (which would handle dependencies) but just a compressed tar archive. The install was not exactly intuitive so I thought I would make a note of it here for others.
I extracted the CrayonPhysicsDeluxe folder that is in the tar archive into my home directory.
Then I opened a terminal window (alt + ctrl + t) and since one of the files in the folder was called launcher I decided that was a good place to start. I tried to run it and got the following error:

mike@sleepycat:~/CrayonPhysicsDeluxe$./launcher
./launcher: error while loading shared libraries: libmikmod.so.2: cannot open shared object file: No such file or directory

It turns out that libmikmod and another library need to be installed to get this game up and running…

sudo apt-get install libmikmod2 libsmpeg0

You will also need to make the file “crayon” in the CrayonPhysicsDeluxe folder executable as well:

mike@sleepycat:~/CrayonPhysicsDeluxe$ chmod +x crayon

I can’t remember if I had to chmod the launcher file as well, but if you run “ls” on ~/CrayonPhysicsDeluxe launcher and crayon should both be green.

Happy drawing!

Using a Rogers Rocket Stick/Telecom T Stick with Ubuntu 10.10

Months ago I got a ZTE MF627 USB modem from Telecom New Zealand. It’s essentially a cell phone the size of a usb memory stick. There it is known as a T-stick, here in Ottawa, Rogers sells it as the Rogers Rocket stick. It didn’t work when I tried it initially, something to do with the kernel version that Ubuntu was using at the time. Well a few versions have ticked by and now I am running 2.6.35-28-generic and decided to give it another try. I am happy to say that this won’t be a post about solving a problem. I plugged it in, clicked through a wizard, and it works. You get to the wizard by right clicking on your network icon, selecting “edit connections” and in the Network connections box that opens click “Mobile Broadband” and then add. All the info about APN settings and whatnot are in there once you say what provider you are with. I am really impressed with how easy it was. The only downside to the whole thing is that it takes a minute or two to get connected once you plug it in. Other than that I am really pleased with how easy they made it to get this thing working. Kudos!

Splitting Flac files on Ubuntu

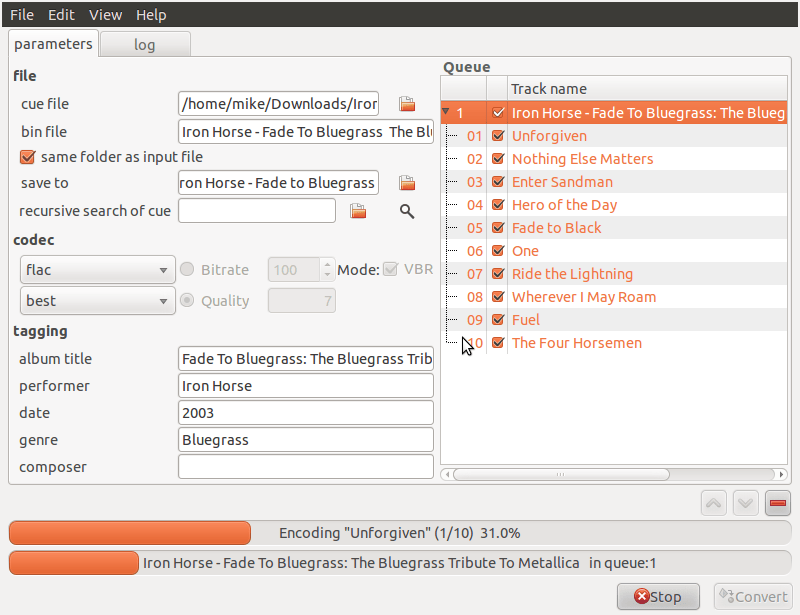
There have been a few occasions where I have found myself with an album saved as a single flac file, a cue file and no idea what to do next. Well it turns out that splitting flac files according to a cue sheet is a pretty easy thing once you have the right software. The right software in this case is the rather unlikely-to-ever-turn-up-in-your-google-search program gCue2tracks.

Splitting files with gCue2tracks

Its simple enough that it really doesn’t warrant any explanation. Simply point it to the cue file and click convert. It works on flac, ape and several other files. An easy to install deb file can be found here. If it complains about needing “oggenc” when you try to use it just run “sudo apt-get install vorbis-tools” and it will install the ogg encoder gCue2Tracks is looking for. Likewise if you ask it to save as flac it may complain that it can’t find “flac”… the solution is “sudo apt-get install flac”.

For the moderately more adventurous, pulling the current version from the repository is also an option. It will get you the current version (5.2) but there are no any significant changes since 2010. Its easy to do in any case:

sudo apt-get install mercurial #so you have the hg command installed
hg clone http://trac-hg.assembla.com/gCue2tracks/
cd gCue2tracks
./gCue2tracks.py

Of course if you run it like that, make sure you have installed its dependencies with “sudo apt-get install cuetools shntool libav-tools”.

Scripting MySQL database setup for Rails with Bash

I am working a bash script to set up a complicated application. As part of that setup I need to run a series of SQL commands to create the initial users and databases this app will require.

It turns out you can get mysql to execute arbitrary statements from the command line using the -e switch but that would be both ugly and tedious for a lot of statements. Sounds like a job for heredocs! Lets try it out:

mike@railsdev:~$ read -d ” test <<‘EOT’
create database test;
select 1;
EOT

mike@railsdev:~$ mysql -u root -ppassword -e “$test”
+—+
| 1 |
+—+
| 1 |
+—+

Perfect! I love it when things work the way you expect. On to useful stuff:

read -d ” MYSQL_SETUP <<'EOF'
create database myapp_test;
create database myapp_development;
create database myapp_production;
CREATE USER 'appuser'@'localhost' IDENTIFIED BY 'myapp_password';
grant all privileges on myapp_production.* to appuser@localhost;
grant all privileges on myapp_test.* to appuser@localhost;
grant all privileges on myapp_development.* to appuser@localhost;
EOF

mysql -u root -ppassword -e "$MYSQL_SETUP"

And then use the same trick to write a nice new database.yml for the app to use those credentials:

read -d ” DB_CREDENTIALS <<'EOF'
production:
adapter: mysql
database: myapp_production
pool: 5
username: appuser
password: myapp_password

development:
adapter: mysql
database: myapp_development
pool: 5
username: appuser
password: myapp_password

test:
adapter: mysql
database: myapp_test
pool: 5
username: appuser
password: myapp_password
EOF

read -d '' DB_CREDENTIALS < /var/www/myapp/config/database.yml

Creating Rails users in Postgres on Ubuntu

Note: Since writing this I have revisited this issue and found a better way. read about it here.

I am getting started with a new greenfield Rails app and had a bit of an adventure setting up a user for my Rails app in Postgres. My attempts to connect or create a database would fail. I thought I had created a user properly but apparently I was wrong.
Now I know for next time.
Start with the create user command:


mike@sleepycat:~$ sudo -u postgres createuser --createdb --pwprompt desired_username

You can see we are using the createdb option in this call, allowing the user we are creating to create new databases. You can take a look at the databases available and the users that can access them with the command:


sudo -u postgres psql -l

So now lets assign the user we created rights on the database we just created with:


mike@sleepycat:~$ sudo -u postgres psql my_project_development -c "grant all privileges on database my_project_development to desired_username;"
GRANT

I had hoped that might be all that was needed but then my rake task crapped out:


mike@sleepycat:~$ rake db:create

Couldn't create database for {"encoding"=>"unicode", "username"=>"desired_username", "adapter"=>"postgresql", "database"=>"my_project_test", "pool"=>5, "password"=>nil}
FATAL:  Ident authentication failed for user "desired_username"

It turns out that Postgres is set to expect the user accessing the database to actually have a system account. That seems like a little much for a development environment where I would end up with tonnes of those accounts. To change that expectation you need to edit the host-based authentication configuration file pg_hba.conf:


sudo vim /etc/postgresql/8.4/main/pg_hba.conf

Press capital G to jump to the bottom of the file and change “local all postgres ident” and “local all all ident” to md5 as shown below:


# DO NOT DISABLE!
# If you change this first entry you will need to make sure that the
# database super user can access the database using some other method.
# Noninteractive access to all databases is required during automatic maintenance
#(custom daily cronjobs, replication, and similar tasks).
# Database administrative login by UNIX sockets
local   all         postgres         md5

# TYPE  DATABASE    USER        CIDR-ADDRESS      METHOD
# "local" is for Unix domain socket connections only

local   all         all         md5
# IPv4 local connections:
host    all         all         127.0.0.1/32    md5
# IPv6 local connections:
host    all         all         ::1/128       md5

Restart your Postgres server and you should be good to go.


mike@sleepycat:~/projects/key_master$ sudo /etc/init.d/postgresql-8.4 restart
* Restarting PostgreSQL 8.4 database server
...done.

Now your Rails users don’t need to have system accounts and your rake tasks should run just fine. Back to work!

Thanks to Mark Berry for his comments below! They have been incorporated into the post now.

Setting CLI resolution in Ubuntu

Setting the resolution for the console is not much of a concern normally. Your virtual terminals are set to a reasonable resolution by default on a normal Ubuntu desktop installation. If you run Ubuntu server in a virtual machine, however, you are stuck with 640×480 resolution.

Recent versions of Ubuntu all use Grub2 so the way to change the resolution is now:

sudo vi /etc/default/grub

Then add the following:

GRUB_GFXMODE=1024×768
GRUB_GFXPAYLOAD_LINUX=keep

Save the file and run:

sudo update-grub

On your next reboot, there it will be.

no such file to load — json?

While upgrading a project of mine to Rails 3 I stumbled upon a json error. I don’t know what exactly caused it since I have been upgrading from Ubuntu Karmic to Lucid in the past few days. Since this took a little head scratching I thought I would write it down here so I don’t forget. Hopefully it will save someone else some fooling around as well.
The error is coming from the jsvars plugin which is trying to call require ‘json’.

mike@sleepycat:~/projects/todasaulas$ rails s
=> Booting WEBrick
=> Rails 3.0.0 application starting in development on http://0.0.0.0:3000
=> Call with -d to detach
=> Ctrl-C to shutdown server
Exiting
/usr/lib/ruby/gems/1.8/gems/activesupport-3.0.0/lib/active_support/dependencies.rb:239:in `require’: no such file to load — json (LoadError)
from /usr/lib/ruby/gems/1.8/gems/activesupport-3.0.0/lib/active_support/dependencies.rb:239:in `require’
from /usr/lib/ruby/gems/1.8/gems/activesupport-3.0.0/lib/active_support/dependencies.rb:225:in `load_dependency’
from /usr/lib/ruby/gems/1.8/gems/activesupport-3.0.0/lib/active_support/dependencies.rb:591:in `new_constants_in’
from /usr/lib/ruby/gems/1.8/gems/activesupport-3.0.0/lib/active_support/dependencies.rb:225:in `load_dependency’
from /usr/lib/ruby/gems/1.8/gems/activesupport-3.0.0/lib/active_support/dependencies.rb:239:in `require’
from /home/mike/projects/todasaulas/vendor/plugins/jsvars/lib/jsvars.rb:1

It turns out that json is provided by libjson-ruby on Ubuntu so the fix was as easy as

mike@sleepycat:~$ sudo aptitude install libjson-ruby

I’m not sure why things were working before if that wasn’t there. Who knows all the stuff that gets changed in an upgrade. You learn something new everyday.