Mastodon

Using ghcr: a credential managment side quest

GitHub has included it’s own OCI image registry for a long time but it’s only recently that I ended up needing it.

While authenticating docker printed out a warning…

WARNING! Your credentials are stored unencrypted in '/home/mike/.docker/config.json'.
Configure a credential helper to remove this warning. See
https://docs.docker.com/go/credential-store/

Things like this bug me, so I wanted to loop back and figure this out.

Getting a token

Using GitHub’s container registry requires an auth token, so we can start our adventure by going to github.com/settings/token and clicking the “Generate New Token” button.

Since GitHub made the somewhat strange decision to associate “packages” with your account (by default) rather than a repo, just choosing a classic (non-repo scoped) token seems like a good fit.

Securing your token

Getting the token solves the authentication problem, but instantly creates a credential management problem.

To solve that problem Docker offers the docker-credential-helper. It has a few flavours, that each delegate management of the credentials to some other service.

Secure against what?

As a developer, my threat model somewhat unavoidably includes running untrusted code, usually in the form of npm postinstall hooks; Shai Halud 2.0 was a recent example of how postinstall scripts are used to harvest credentials.

With this in mind I want my credentials encrypted, and I want to to be prompted when they are getting decrypted.

The pass command line tool does both of those things, so I’ll start by installing that.

Installing pass

On Manjaro or Archlinux you can install pass with pacman:

sudo pacman -S pass

Pass uses gpg but it’s a long time since I messed with that, so I’ll generate a new key with gpg --full-generate-key . Take the email you used to initialize your key (let’s assume it’s me@example.com) and run pass init:

$ pass init me@example.com
mkdir: created directory '/home/mike/.password-store/'
Password store initialized for me@example.com

Now that we have somewhere to store our passwords, let’s get the credential helper installed. On Manjaro or Archlinux you can install that helper from the AUR with Yay:

$ yay -S docker-credential-pass

After that we need to change our docker config to tell docker to delegate credential handling to pass. Then we’ll restart the docker service for good measure.

$ jq '. += {"credsStore": "pass"}' ~/.docker/config.json | sponge ~/.docker/config.json
$ sudo systemctl restart docker.service

Logging into GHCR

If I use pass ls now, I can see there is nothing in my credential store. Lets login to ghcr.io and see if docker stores the password in pass.

$ # use read to define a variable by prompting you for your token
$ read -rs SECRET
$ echo $SECRET | docker login --username myuser ghcr.io --password-stdin
Login Succeeded
$ pass ls
Password Store
└── docker-credential-helpers
    └── Z2hjci5pbw==
        └── myuser

Importantly, cat ~/.password-store/docker-credential-helpers/Z2hjci5pbw\=\=/myuser.gpg shows they are encrypted, so exfiltrating them is useless. And if a malicious script attempts to decrypt them by running echo "ghcr.io" | docker-credential-pass get or directly using pass with pass docker-credential-helpers/Z2hjci5pbw==/myuser I’ll be prompted, so my credentials can’t be silently stolen anymore.

Now I’m ready to docker build -t ghcr.io/username/project/image:latest . and push/pull as normal.

The road not taken: secret service

One other option I explored and eventually rejected was docker-credential-secretservice, which delegates to the linux desktop secret service.

On Manjaro or Archlinux you can install that helper from the AUR with Yay:

$ yay -S docker-credential-secretservice

You’ll need to update your ~/.docker/config.json to specify that you want to use the secret service (docs).

$ jq '. += {"credsStore": "secretservice"}' ~/.docker/config.json | sponge ~/.docker/config.json

Afterwards, simply use docker login and it’ll prompt you for your password, and store it in your operating systems secret store.

$ docker login --username myuser ghcr.io
Password:
Login Succeeded

Whats the problem with that?

I had high hopes for this initially but after some investigation I realized it’s not a good fit for the developer threat model.

Using the secret service means the password is stored with our other credentials in secret service and accessible via the Passwords and Keys app (the GUI frontend for the Gnome Keyring service).
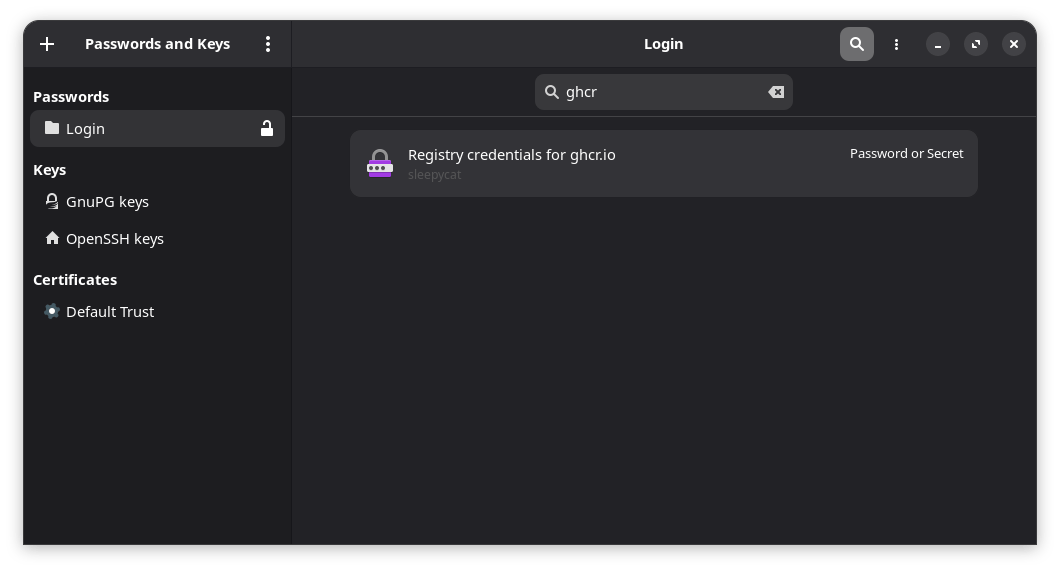
While we’ve avoided leaving unencrypted credentials lying around on disk, we’ve ended up running into the limitations of the Gnome Keyring security model; The user session is the trust boundary, and (all!) programs running within that boundary can access the credentials once the keyring is unlocked.

For a normal desktop user that might be a plausible security assumption, but as a developer, running untrusted code inside that session trust boundary is uncomfortably common.

Since docker-credential-secretservice stores it’s credentials on the default keyring and that keyring is unlocked on login and stays unlocked for the duration of your session, this is pretty underwhelming security-wise.

This means that any malicious npm postinstall script can list my credentials and silently access my token(s) without me ever knowing.

$ docker-credential-secretservice list
{"Registry credentials for ghcr.io":"myuser"}
$ echo "ghcr.io" | docker-credential-secretservice get
{"ServerURL":"ghcr.io","Username":"myuser","Secret":"ghp_abc123YourActualPlaintextTokenHere"}

Safer development practices

Doing development inherently involves running some amount of untrusted code. While pass looks pretty great for mitigating some of the consequences, it’d be nice to address the root problem too.

For those looking to push secure development further putting pass together with something like Deno which doesn’t execute postinstall hooks by default, makes things safer still.

A look at Overlay FS

Lots has been written about how Docker combines linux kernel features like namespaces and cgroups to isolate processes. One overlooked kernel feature that I find really interesting is Overlay FS.

Overlay FS was built into the kernel back in 2014, and provides a way to “present a filesystem which is the result over overlaying one filesystem on top of the other.”

To explore what this means, lets create some files and folders to experiment with.

$ for i in a b c; do mkdir "$i" && touch "$i/$i.txt"; done
$ mkdir merged
$ tree
.
├── a
│   └── a.txt
├── b
│   └── b.txt
├── c
│   └── c.txt
└── merged

4 directories, 3 files

At this point we can use Overlay FS to overlay the contents of a, b and c and mount the result in the merged folder.

$ sudo mount -t overlay -o lowerdir=a:b:c none merged
$ tree
.
├── a
│   └── a.txt
├── b
│   └── b.txt
├── c
│   └── c.txt
└── merged
    ├── a.txt
    ├── b.txt
    └── c.txt

4 directories, 6 files
$ sudo umount merged

With merged containing the union of a,b and c suddenly the name “union mount” makes a lot of sense.

If you try to write to the files in our union mount, you will discover they are not writable.

$ echo a > merged/a.txt
bash: merged/a.txt: Read-only file system

To make them writable, we will need to provide an “upper” directory, and an empty scratch directory called a “working” directory. We’ll use c as our writable upper directory.

$ mkdir working
$ sudo mount -t overlay -o lowerdir=a:b,upperdir=c,workdir=working none merged

When we write to a file in one of the lower directories, it is copied into a new file in the upper directory. Writing to merged/a.txt creates a new file with a different inode than a/a.txt in the upper directory.

$ tree
.
├── a
│   └── a.txt
├── b
│   └── b.txt
├── c
│   └── c.txt
├── merged
│   ├── a.txt
│   ├── b.txt
│   └── c.txt
└── working
    └── work [error opening dir]

6 directories, 6 files
$ echo a > merged/a.txt
$ tree --inodes
.
├── [34214129]  a
│   └── [34214130]  a.txt
├── [34217380]  b
│   └── [34217392]  b.txt
├── [34217393]  c
│   ├── [34737071]  a.txt
│   └── [34211503]  c.txt
├── [34217393]  merged
│   ├── [34214130]  a.txt
│   ├── [34217392]  b.txt
│   └── [34211503]  c.txt
└── [34737069]  working
    └── [34737070]  work [error opening dir]

6 directories, 7 files

Writing to merged/c.txt modifies the file directly, since c is our writable upper directory.

$ echo c > merged/c.txt
$ tree --inodes
.
├── [34214129]  a
│   └── [34214130]  a.txt
├── [34217380]  b
│   └── [34217392]  b.txt
├── [34217393]  c
│   ├── [34737071]  a.txt
│   └── [34211503]  c.txt
├── [34217393]  merged
│   ├── [34214130]  a.txt
│   ├── [34217392]  b.txt
│   └── [34211503]  c.txt
└── [34737069]  working
    └── [34737070]  work [error opening dir]

6 directories, 7 files

After a little fooling around with Overlay FS, the GraphDriver output from docker inspect starts looking pretty familiar.

$ docker inspect node:alpine | jq .[].GraphDriver.Data
{
  "LowerDir": "/var/lib/docker/overlay2/b999fe6781e01fa651a9cb42bcc014dbbe0a9b4d61e242b97361912411de4b38/diff:/var/lib/docker/overlay2/1c15909e91591947d22f243c1326512b5e86d6541f83b4bf9751de99c27b89e8/diff:/var/lib/docker/overlay2/12754a060228233b3d47bfb9d6aad0312430560fece5feef8848de61754ef3ee/diff",
  "MergedDir": "/var/lib/docker/overlay2/25aba5e7a6fcab08d4280bce17398a7be3c1736ee12f8695e7e1e475f3acc3ec/merged",
  "UpperDir": "/var/lib/docker/overlay2/25aba5e7a6fcab08d4280bce17398a7be3c1736ee12f8695e7e1e475f3acc3ec/diff",
  "WorkDir": "/var/lib/docker/overlay2/25aba5e7a6fcab08d4280bce17398a7be3c1736ee12f8695e7e1e475f3acc3ec/work"
}

We can use these like Docker does to mount the file system for the node:alpine image into our merged directory, and then take a peek to see the nodejs binary that image includes.

$ lower=$(docker inspect node:alpine | jq .[].GraphDriver.Data.LowerDir | tr -d \")
$ upper=$(docker inspect node:alpine | jq .[].GraphDriver.Data.UpperDir | tr -d \")
$ sudo mount -t overlay -o lowerdir=$lower,upperdir=$upper,workdir=working none merged
$ ls merged/usr/local/bin/
docker-entrypoint.sh  node  nodejs  npm  npx  yarn  yarnpkg

From there we could do a partial version of what Docker does for us, using the unshare command to give a process it’s own mount namespace and chroot it to the merged folder. With our merged directory as it’s root, running ls /usr/local/bin command should give us those node binaries again.

$ sudo unshare --mount --root=./merged ls /usr/local/bin
docker-entrypoint.sh  nodejs                npx                   yarnpkg
node                  npm                   yarn

Seeing Overlay FS and Docker’s usage of it has really helped flesh out my mental model of containers. Watching docker pull download layer after layer has taken on a whole new significance.

Docker networking

I spent some time this week working on building a Docker image using a Dockerfile. In the process I learned a little about networking with Docker that I wanted to record here before I forget about it.

One of the steps in building my image was to update the list of packages using apt-get update. Mysteriously during the build I would get these errors:

sudo docker build -t="build_2013-10-03" .
Uploading context 20480 bytes
Step 1 : FROM colinsurprenant/ruby-1.9.3-p448
 ---> 6d1e62cb5cff
...
Step 5 : RUN apt-get install --assume-yes software-properties-common sudo libmysqlclient-dev vim
 ---> Running in 481577d7acec
...
Err http://us.archive.ubuntu.com/ubuntu/ raring/main libapt-inst1.5 amd64 0.9.7.7ubuntu4
  Something wicked happened resolving 'us.archive.ubuntu.com:http' (-11 - System error)

Logging in to the container gave me a pointer in the form of a warning and an confirmation of the problem:

sudo docker run -i -t colinsurprenant/ruby-1.9.3-p448 /usr/bin/env bash
WARNING: IPv4 forwarding is disabled.
root@0836328ec06a:/# ping us.archive.ubuntu.com
ping: unknown host us.archive.ubuntu.com

Since Docker containers are run inside a namespace and AuFS is used to hold their files, the only thing shared between the host OS and the container is the kernel. For IP traffic to move between guest and host the kernel must be set to do IP forwarding.

To enable this I needed to use the sysctl command and then restart the Docker daemon:

sudo sysctl -w net.ipv4.ip_forward=1

That little test solved my problem and so the next step was to ensure that the new setting would survive a reboot. As with almost all things on Linux, it just meant editing a configuration file:

sudo vim /etc/sysctl.conf

# Kernel sysctl configuration file for Red Hat Linux
#
# For binary values, 0 is disabled, 1 is enabled.  See sysctl(8) and
# sysctl.conf(5) for more details.

# Controls IP packet forwarding
net.ipv4.ip_forward = 1

My next learning about how networking works with Docker came from wanting the app in my container to access the MySQL database on the host. It turns out that docker creates a network interface:

mike@sleepycat:~☺  ifconfig
docker0   Link encap:Ethernet  HWaddr 9e:b5:ca:76:70:c3  
          inet addr:172.17.42.1  Bcast:0.0.0.0  Mask:255.255.0.0
          inet6 addr: fe80::9cb5:caff:fe76:70c3/64 Scope:Link
          UP BROADCAST RUNNING MULTICAST  MTU:1500  Metric:1
          RX packets:0 errors:0 dropped:0 overruns:0 frame:0
          TX packets:65 errors:0 dropped:0 overruns:0 carrier:0
          collisions:0 txqueuelen:0 
          RX bytes:0 (0.0 B)  TX bytes:10675 (10.6 KB)
...

So on the host side I need to get MySQL to bind to 172.17.42.1, and containers (which will all end up on the 172.x.x.x network) will just connect to that. Don’t forget that your MySQL user ‘x’@’localhost’ won’t be able to connect when its logging in from 172.x.x.x and that you will need to add the “host: 172.17.42.1” to your database.yml.

The only real down side to all this Docker stuff has been that the extra layer of abstraction can make things a little hard on the head. The potential for repeatable, self documenting app deployments using Dockerfiles is pretty exciting. I’m impressed with what I have seen and I know that what I am doing is still pretty primitive. We’ll see what’s next.

Understanding Docker

Docker has generated alot of buzz lately and seems poised to fundamentally change how apps get deployed. With the apps I work on increasingly dependent on the environment (environmental vars, cron jobs and additional libraries) having a way of encapsulating my app and its environment is pretty appealing. With that in mind I’ve playing with docker for a little while but I found I had a hard time building a clear picture in my head of what is actually going on.

The tutorials all feel a little magical and a lot of the docs for the commands end up being stuff like “docker pull: pulls an image” which is pretty unsatisfying. So while I am still just getting started with Docker I thought I would share what I have pieced together so far and use it as an opportunity to explain this to myself as well.

The first thing to point out is that Docker is built on top of AuFS, Linux Containers (LXC), and cgroups (lots of details here). Doing some reading about those things first really helps understand what is going on.

While that is neat, I am a pretty visual person so for me to feel like I have any idea of what is going on I need to see it. So to do that I created my own image using the traditional debootstrap command:

☺  sudo debootstrap raring raring64
I: Retrieving InRelease
I: Failed to retrieve InRelease
I: Retrieving Release
I: Retrieving Release.gpg
....

You can see it created a folder with the following sub-folders:

ls raring64/
bin   dev  home  lib64  mnt  proc  run   selinux  sys  usr
boot  etc  lib   media  opt  root  sbin  srv      tmp  var

Then we tar up the folder and piping it into dockers import command. This creates the image and prints out the hash id of the image before exiting:

☺ sudo tar -C raring64 -c . | sudo docker import - raring64
9a6984a920c9

If I dig I can then find those folders in the docker graph folder:

☺ sudo ls /var/lib/docker/graph/9a6984a920c9badcaed6456bfdef2f20a414b08ed09acfd9140f2124065697b2/layer
bin   dev  home  lib64	mnt  proc  run	 selinux  sys  usr
boot  etc  lib	 media	opt  root  sbin  srv	  tmp  var

I can then log into that image by asking docker to run interactively (-i) and give me a pseudo tty (-t). But notice the host name on the root prompt you get when you get docker to run bash (which changes each time):

☺ sudo docker run -i -t raring64 /usr/bin/env bash
WARNING: Docker detected local DNS server on resolv.conf. Using default external servers: [8.8.8.8 8.8.4.4]
root@b0472d03f134:/# exit
exit
☺ sudo docker run -i -t raring64 /usr/bin/env bash
WARNING: Docker detected local DNS server on resolv.conf. Using default external servers: [8.8.8.8 8.8.4.4]
root@76c7860cf94e:/# exit
exit

If I run some commands that change the state of that image and I want to keep them I will need to use the hash we can see in the host name to commit that change back to the graph directory. So for example, I installed git (with “apt-get install git”) and afterwards I commit the change:

☺ sudo docker commit 76c7860cf94e raring_and_git
c153792e04b4

Sure enough this creates a new directory inside /var/lib/docker/graph/ that contains this difference between the original image (my raring64 image) and my new one with git:

☺ sudo ls /var/lib/docker/graph/
27cf784147099545						  9a6984a920c9badcaed6456bfdef2f20a414b08ed09acfd9140f2124065697b2  c153792e04b4a164b9eb981e0f59a82c8775cad90a7771045ba3c6daabc41f23  :tmp:
8dbd9e392a964056420e5d58ca5cc376ef18e2de93b5cc90e868a1bbc8318c1c  b750fe79269d2ec9a3c593ef05b4332b1d1a02a62b4accb2c21d589ff2f5f2dc  checksums

☺ sudo ls /var/lib/docker/graph/c153792e04b4a164b9eb981e0f59a82c8775cad90a7771045ba3c6daabc41f23/layer
dev  etc  lib  tmp  usr  var

It is the job of AuFS to take all the folders and files in the graph directory and sort of sum them into a single filesystem with all the files from raring64 + the new files that changed when I installed git. Docker can then use that filesystem as the base from which to run its namespaced process (similar to chroot).

All of this creates a pretty “git-like” experience where each hash represents a change set applied to a base set of files.

From here building out images takes one of two forms; give yourself an interactive bash session, make your changes and then commit them, or use a Dockerfile.

So this feels like a solid starting point in the world of Docker, and its a pretty exciting world. In fact I am looking forward to deploying my next app… how often can you say that?